Deploying Bitbucket Projects with Vercel
Vercel for Bitbucket automatically deploys your Bitbucket projects with Vercel, providing Preview Deployment URLs, and automatic Custom Domain updates.
The Deploying a Git repository guide outlines how to create a new Vercel Project from a Bitbucket repository, and enable automatic deployments on every branch push.
If you'd like to connect your Vercel Project to a different Bitbucket repository or disconnect it, you can do so from the Git section in the Project Settings.
Vercel for Bitbucket will deploy each push by default. This includes pushes and pull requests made to branches. This allows those working within the project to preview the changes made before they are pushed to production.
With each new push, if Vercel is already building a previous commit on the same branch, the current build will complete and any commit pushed during this time will be queued. Once the first build completes, the most recent commit will begin deployment and the other queued builds will be cancelled. This ensures that you always have the latest changes deployed as quickly as possible.
If Custom Domains are set from a project domains dashboard, pushes and merges to the Production Branch (commonly "main") will be made live to those domains with the latest deployment made with a push.
If you decide to revert a commit that has already been deployed to production, the previous Production Deployment from a commit will automatically be made available at the Custom Domain instantly; providing you with instant rollbacks.
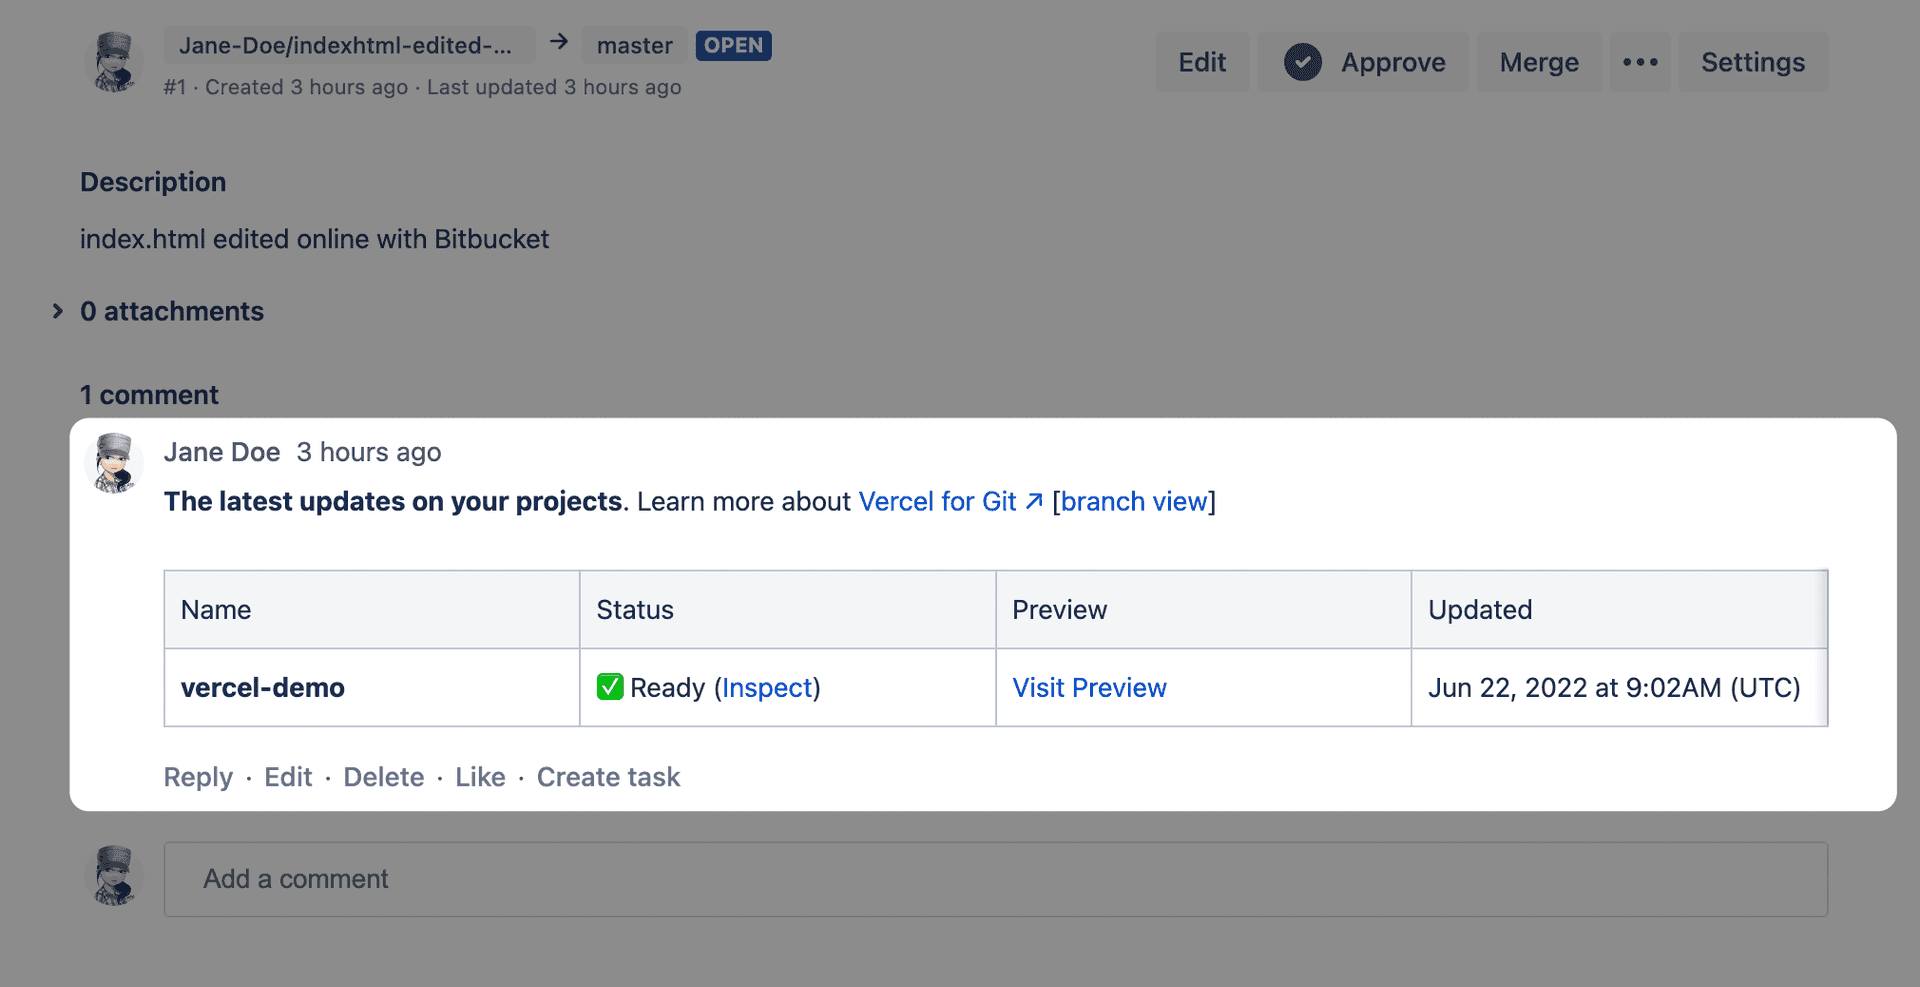
The latest push to any pull request will automatically be made available at a unique preview URL based on the project name, branch, and team or username. These URLs will be given through a comment on each pull request.

You may want to use different workflows and APIs based on Git information. To support this, the following System Environment Variables are exposed to your Deployments:
The Git Provider the deployment is triggered from. In the case of Bitbucket, the value is always bitbucket.
The slug of the Bitbucket repository that was deployed.
VERCEL_GIT_REPO_SLUG=my-siteThe Bitbucket user or team that the project belongs to.
VERCEL_GIT_REPO_OWNER=acmeThe ID of the Bitbucket repository the deployment is triggered from.
VERCEL_GIT_REPO_ID=9e072df2-521e-4409-a01c-c984569fea20The Bitbucket branch that the deployment was triggered by.
VERCEL_GIT_COMMIT_REF=improve-about-pageThe Bitbucket sha of the commit the deployment was triggered by.
VERCEL_GIT_COMMIT_SHA=fa1eade47b73733d6312d5abfad33ce9e4068081The message accompanying the Bitbucket commit that was deployed. The message is truncated if it exceeds 2048 bytes.
VERCEL_GIT_COMMIT_MESSAGE=Add John Doe to about pageThe name of the commit author on Bitbucket.
VERCEL_GIT_COMMIT_AUTHOR_LOGIN=John DoeBitbucket profile URL of the commit author.
VERCEL_GIT_COMMIT_AUTHOR_NAME=https://bitbucket.org/%7B45585b19-b616-401e-89d3-1a47fddb7033%7D/The Bitbucket pull request id the deployment was triggered by. If a deployment is created on a branch before a pull request is made, this value will be an empty string.
VERCEL_GIT_PULL_REQUEST_ID=23We require some permissions through our Vercel for Bitbucket integration. Below are listed the permissions required and a description for what they are used for.
Repository permissions allow us to interact with repositories belonging to or associated with (if permitted) the connected account.
| Permission | Read | Write | Description |
|---|---|---|---|
Web Hooks | Y | N | Allows us to react to various Bitbucket events. |
Issues | Y | Y | Allows us to interact with Pull Requests as with the Pull Requests permissions due to Bitbucket requiring both for access. |
Repository | N | N | Allows us to access admin features of a Bitbucket repository. |
Pull requests | Y | Y | Allows us create deployments for each Pull Request (PR) and comment on those PR's with status updates. |
Organization permissions allow us to offer an enhanced experience through information about the connected organization.
| Permission | Read | Write | Description |
|---|---|---|---|
Team | Y | N | Allows us to offer a better team onboarding experience. |
User permissions allow us to offer an enhanced experience through information about the connected user.
| Permission | Read | Write | Description |
|---|---|---|---|
Account | Y | N | Allows us to associate an email with a Bitbucket account. |
We use the permissions above in order to provide you with the best possible deployment experience. If you have any questions or concerns about any of the permission scopes, please contact Vercel Support.
To sign up on Vercel with a different Bitbucket account, sign out of your current Bitbucket account. Then, restart the Vercel signup process.
When importing or connecting a Bitbucket repository, we require that you have Admin access to the corresponding repository, so that we can configure a webhook and automatically deploy pushed commits.
If a repository is missing when you try to import or connect it, make sure that you have Admin access configured for the repository.
By default, comments from the Vercel bot will appear on your pull requests and commits. You can silence these comments in your project's settings:
- From the Vercel dashboard, select your project
- From the Settings tab, select Git
- Under Connected Git Repository, toggle the switches to your preference
It is currently not possible to prevent comments for specific branches.
You can use Bitbucket Pipelines to build and deploy your Vercel Application.
vercel build allows you to build your project inside Bitbucket Pipelines, without exposing your source code to Vercel. Then, vercel deploy --prebuilt skips the build step on Vercel and uploads the previously generated .vercel/output folder to Vercel from the Bitbucket Pipeline.
Learn more about how to configure Bitbucket Pipelines and Vercel for custom CI/CD workflows.
Was this helpful?

