# Building an interactive WebGL experience in Next\.js
**Published:** October 21, 2022 | **Authors:** Paul Henschel, Anthony Shew | **Category:** Field Engineering
*Bring your creativity to life with the web's 3D graphic rendering API\.*
---
WebGL is a JavaScript API for rendering 3D graphics within a web browser, giving developers the ability to create unique, delightful graphics, unlike anything a static image is capable of. By leveraging WebGL, we were able to take what would have been a static conference signup and turned it into [the immersive Next.js Conf registration page](https://nextjs.org/conf/oct22/registration).
In this post, we will show you how to recreate the centerpiece for this experience using open-source WebGL tooling—including a new tool created by Vercel engineers to address performance difficulties around 3D rendering in the browser.
---
1. [Put together a prototype](#1.-put-together-a-prototype)
2. [Enhance the visuals](#2.-enhance-the-visuals)
3. [Optimize performance](#3.-optimize-performance)
---
## The big idea
To begin brainstorming the design, we started generating images with DALL-E using prompts around ideas of 3D rendering, triangles, pyramids, and beams of light. Here are a few examples of the images DALL-E gave us:

*10 permutations of an image generated by DALL-E. The original image also came from DALL-E.*
At this point, we began discussing the beauty of a rainbow and how it expresses everything that light is capable of in the visible spectrum. We began tying this idea back to the future of the Web and how we want to help the Web reach its full potential—like the rainbow. Our designers settled on a rich, striking mood board:
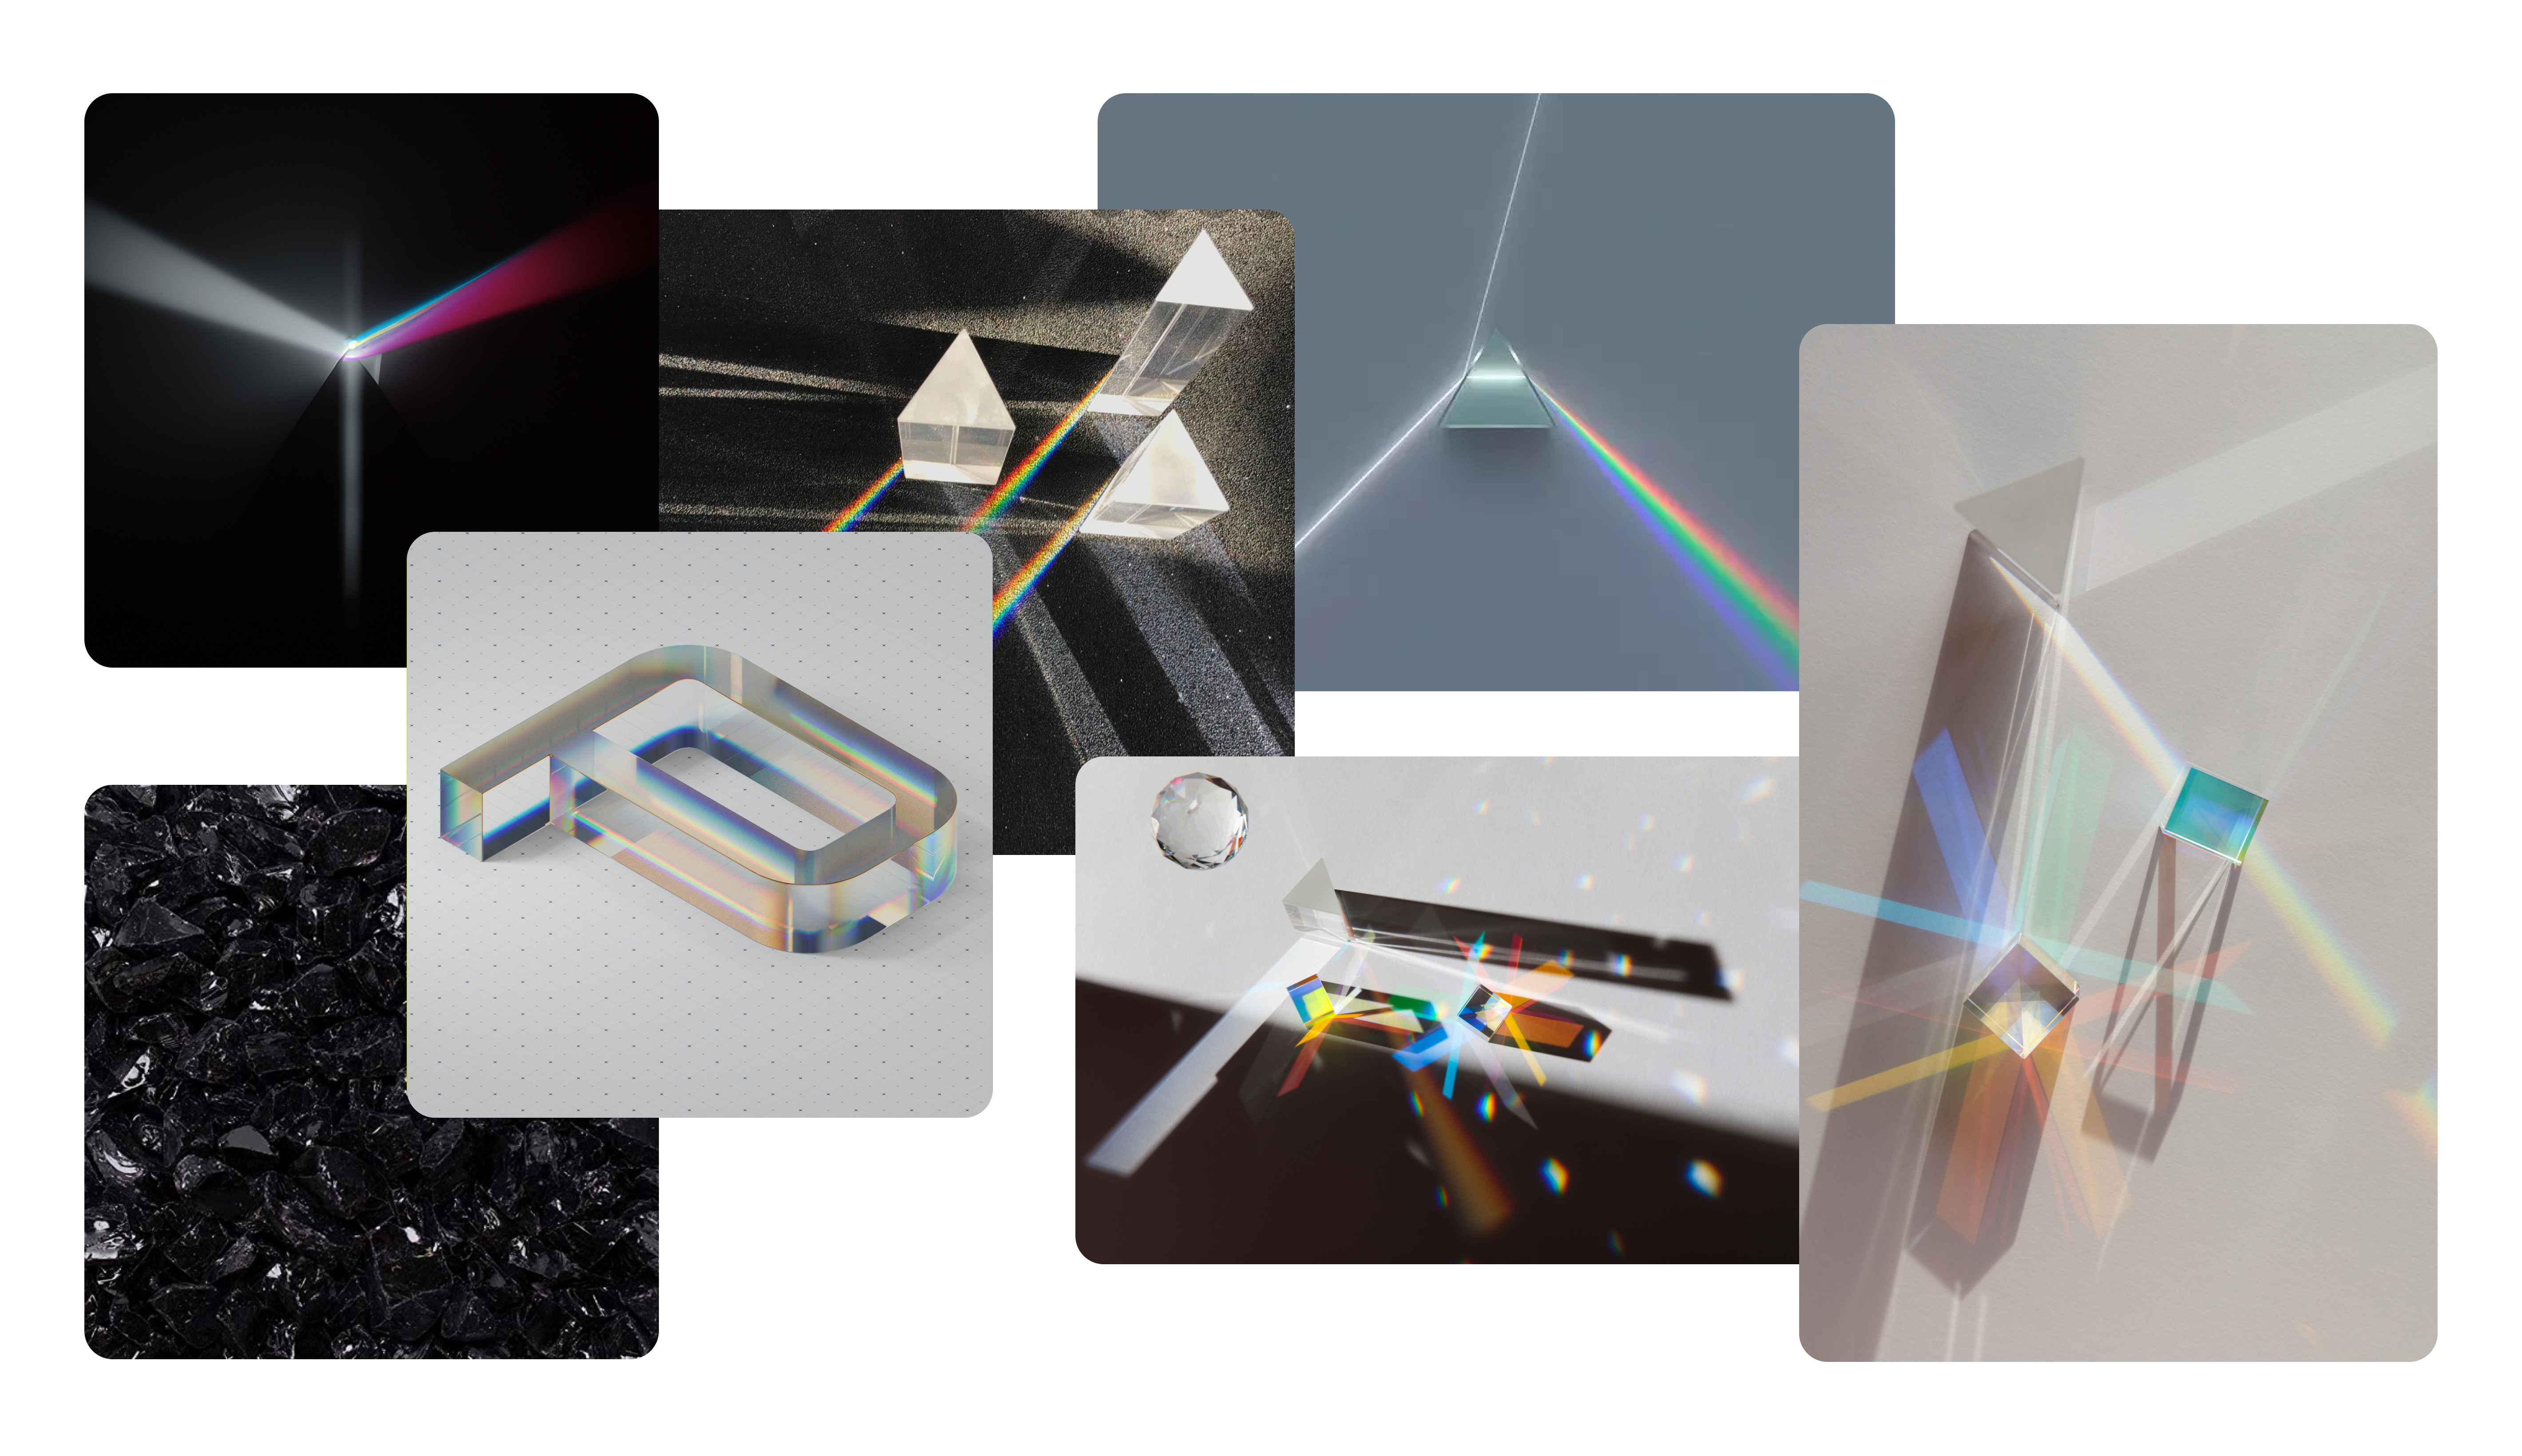
*A mood board depicting many of the concepts that led to the creation of the Next.js Conf registration page. Prisms, beams of light, and rainbows create vivid, eye-catching visual elements.¹*
We also knew we wanted this experience to be **interactive** and [**accessible**](https://vercel.com/blog/improving-the-accessibility-of-our-nextjs-site). We began discussing how beams of light can reveal hidden particles in the air. Putting it all together, the idea became: "What if a user could control a light source to reveal objects in a scene like a light beam does? And what if the light bounced off of other objects, hit a prism, and created a gorgeous rainbow?"
Our next challenge: **how to replicate this in the browser**. After looking at [art from the WebGL community](https://docs.pmnd.rs/react-three-fiber/getting-started/examples), we sat down with WebGL to see how we could achieve this effect.
## 1. Put together a prototype
To build a proof of concept, we reached for a common, open-source set of tooling in the WebGL space. Let's get to know the tools we used so you can build with us.
Two packages from [Poimandres](https://github.com/pmndrs), a developer collective, were key tools for our creative JavaScript project.:
- [**react-three-fiber**](https://github.com/pmndrs/react-three-fiber): A library for using three.js in React components (where Vercel engineer Paul Henschel is a lead maintainer)
- ****[**drei**](https://github.com/pmndrs/drei): A “kitchen sink” library of convenience helpers letting the three.js community share common patterns
### Getting familiar with `react-three-fiber`
`react-three-fiber` lets developers create and interact with objects in a scene using React components. Below is a sandbox to get you started with the basics.
A few things to try with this sandbox:
- Hover a cube to turn it pink
- On line 27, change `hotpink` to `green` and hover the cube again
- Click a cube to toggle its size
- Comment out the `` on line 40 to see the cube on the right disappear
This brings the power of WebGL and `three.js` to React developers in a way that feels familiar, allowing them to create awesome 3D visuals in the browser. `react-three-fiber` also:
- Has no limitations when compared to raw `three.js`. If you can build it with `three.js`, you can build it with `react-three-fiber`.
- Exposes component props like `onRayHit` that can be used to respond to events in your scene similar to native React events (e.g. `onClick`).
- Outperforms `three.js` at scale by leveraging React’s scheduler.
With enough practice, a React developer can build remarkable experiences in the browser that are only limited by their imagination.
### Proving the concept
Now that we know we can build 3D art with React, let’s create the groundwork for an interactive beam of light that bounces off of objects. Once we have this part figured out, we will have something that resembles the core of the mechanics for the game you played on the Next.js Conf registration page.
In your next sandbox, you will find a "light beam" that follows your cursor and reflects off of a few 2D objects in the scene.
Let's break down this sandbox into its key parts so we have a strong foundation to build on.
- First, the `App` function creates a canvas for the scene to be painted onto. We can set an `orthographic` property to make 2D rendering more simple and create a camera with a set zoom level. We also give the background a dark color.
- Next, `Scene` establishes a line that will follow your cursor as you move it. We use `useLayoutEffect` from React and `useFrame`, a custom React hook from `react-three-fiber` that runs every time a new frame is drawn.
- We also need to draw a few shapes to bounce our light ray. `Block` and `Triangle` are React components that have props for `onRayOver` and `onRayOut` that handle their respective events for the activity of the light beam.
- Last, we'll bring in two `.png` files as textures to create the light beam itself as well as the splash of glow where the light ray intersects with an object. Instead of demanding that WebGL do more rendering work, we can let the browser adjust the position of a `.png` for much better performance.
The code here is relatively simple for creating 3D graphics, unlocking a world that lets us create more complex elements, interactions, and scenes through the declarative nature of React.
Next, let's look at bringing in some color.
### Creating a rainbow
We need to produce a rainbow for the final ray exiting the prism. Here, we returned to the open source community for inspiration.
On [shadertoy](https://www.shadertoy.com/), we found two excellent shaders that we thought would combine to create a powerful effect:
- [@alanzucconi](https://twitter.com/AlanZucconi)’s rainbow: [A highly performant visible color spectrum.](https://www.shadertoy.com/view/ls2Bz1)
- Juliapoo’s iridescence: [Amorphous blob creator](https://www.shadertoy.com/view/ltKcWh) to give the rainbow a flowing effect.
The combination of these two shaders can be found in the sandbox below:
## 2. Enhance the visuals
Often, the end result of heavy graphical computing doesn’t come out perfectly. To create a final, appealing outcome, you can use a postprocessor to execute filters and effects on the render output before it is sent to the browser to be painted on screen.
For `three.js` projects, postprocessing is typically considered a must and can enhance visuals tremendously. For this project we used:
- [react-postprocessing](https://github.com/pmndrs/postprocessing): Another package from Poimandres, this library can save developers hundreds of lines of code for usual postprocessing tasks.
- [screen-space-reflections](https://github.com/0beqz/screen-space-reflections): This package captures existing screen data and uses it to create reflections.
`react-postprocessing` is a popular alternative to the three.js `EffectComposer` method due to its performance benefits. Most notably, `EffectComposer` merges all effects into a single one, minimizing the number of render operations.
For our postprocessing, we used three different effects:
- [Bloom](#bloom): Give bright areas a glowing effect
- [Color Lookup Table](#color-lookup-table): Achieve a desired color range
- [Screen Space Reflections](#screen-space-reflections): Create reflections of existing graphical data
### Bloom
Bloom is an effect that puts light fringes around the brightest spots of an image. In digital art, this shader is mimicking the natural effect of real-life camera lenses when reacting to bright light. A camera lens can’t perfectly handle areas of bright light in an image and ends up distributing this light across the rest of the image, creating a halo effect.
[Video: Conf 2022 WebGL bloom example](//videos.ctfassets.net/e5382hct74si/4oTHH1cZ4uml0s0mUuGujN/60e392d074d12eda543037dc9cd25fd3/CleanShot_2022-10-06_at_12.07.20.mp4)
In our case, this shader brings extra life to the bright parts of the light refracting through the prism as well as the beams of white light being mixed into the rainbow.
### Color Lookup Tables
Color Lookup Tables (often abbreviated as LUT) are a method for filtering an original set of colors to a new range for the entire rendered image.
[Video: CleanShot 2022-10-13 at 21.56.45](//videos.ctfassets.net/e5382hct74si/3kY5HGPxZHbVO8FwhdRJKg/8b4971e45727d8ce17743104c463ef08/CleanShot_2022-10-13_at_21.56.45.mp4)
For this project, we used the LUT to give the scene a more blue and cinematic look. If you don't want to dial in the colors yourself, premade LUTs are available from resources like [IWLTBAP](https://luts.iwltbap.com/).
### Screen Space Reflections
Screen Space Reflections were used to make the scene look more dynamic by having the environment reflected within the prism.
[Video: Conf 2022 Screen Space Reflections](//videos.ctfassets.net/e5382hct74si/4KJ3gJRsfUgUxfyk0NV1TM/1adcc47f93d5f5cb701e647ed4647d02/CleanShot_2022-10-19_at_19.27.57.mp4)
Reflections like these can be calculated through a process called “raymarching”. In [raymarching](https://gamedev.stackexchange.com/questions/67719/how-do-raymarch-shaders-work), every pixel on the screen that can have a reflection is calculated, step-by-step, to see where the best point of reflection exists, according to the original point of interest. This process is rather resource intensive so we limited these reflections to only the prism and, additionally, turned them off entirely for mobile devices.
This shader noticeably reflects the rainbow within the prism—but will also reflect other objects like the mirror boxes and the light ray itself when those objects are in the right positions.
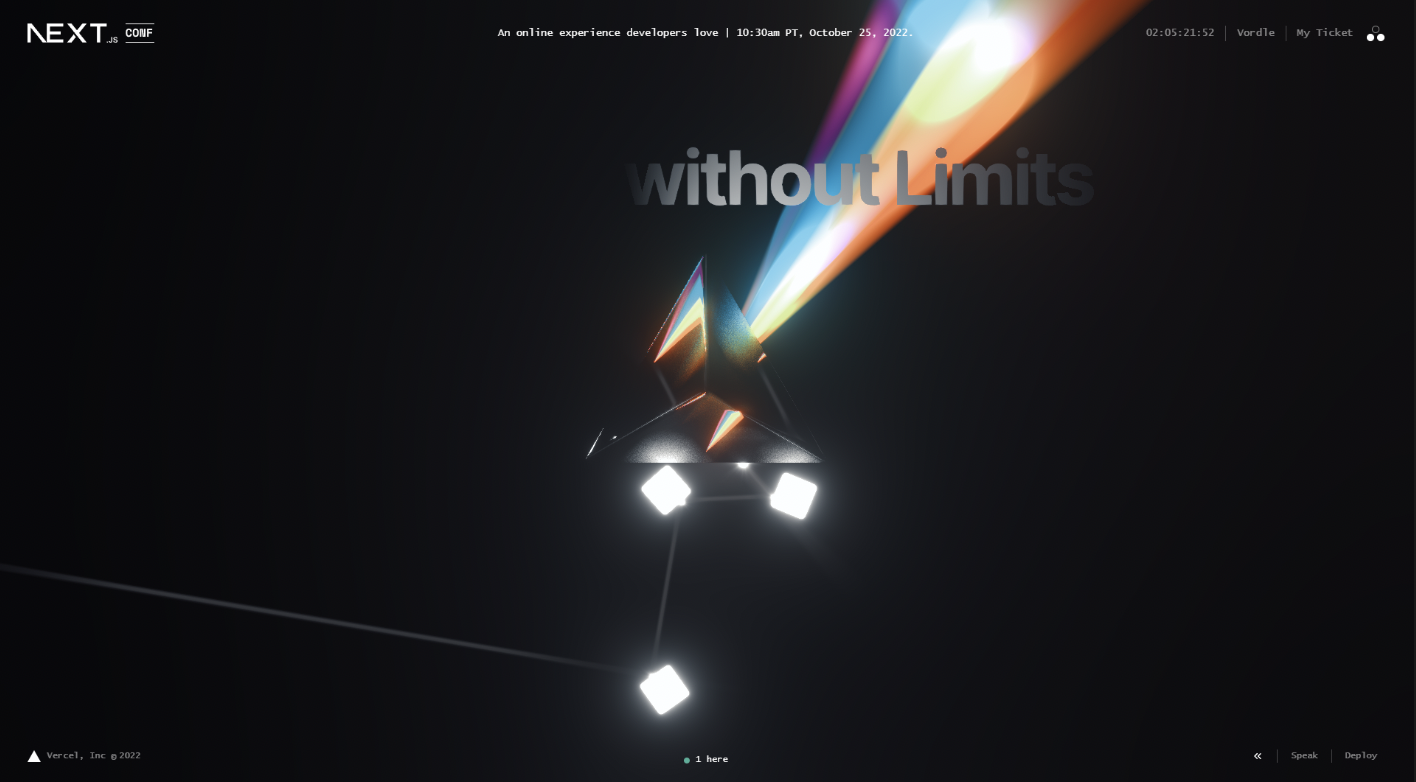
*A screenshot of the Next.js 2022 registration page. The prism is illuminated by the white, glowing blocks that redirect the light source because they are placed quite close to it.*
### All together now
We now have:
- A ray of light
- Objects to bounce it off of
- A prism
- And a rainbow
It's time to put it all together. We've added one last touch for the prism, a beveled model from `drei` on the prism to give it a final bit of detail.
## 3. Optimize performance
This rendering looks great but we also have to consider something else important: performance.
Building up all of these great effects can take a toll on device resources. We noticed that older devices were starting to have trouble, and, after going through lots of tweaks and variations, we still had reports coming in that performance was an issue.
The usual approach to handling device performance in the WebGL community has been to watch GPU utilization. However, this is known to be fraught with buggy behavior since different devices calculate GPU usage differently. This would cause some devices to under- or over-render according to their perceived resource usage.
### Building a new performance monitor
Instead of monitoring resource utilization, we asked “Why not check on the final result of the rendered application to address what our users are actually seeing?”
`drei` now features [a component](https://github.com/pmndrs/drei#performancemonitor) that watches the frames per second (FPS) of the render to see if it is performing within a developer-defined acceptable range. If the FPS drops too low, the application can be made to ease the characteristics of the render to reduce the workload. If the FPS is high and the application can offer a better render, the rendering will improve.
This adaptive approach is a major improvement compared to sniffing GPU utilization or forcing a user to choose a quality level. Here is a code example of how the Performance Monitor works:
```jsx
import { PerformanceMonitor, usePerformanceMonitor } from '@react-three/drei'
import { EffectComposer } from '@react-three/postprocessing'
// The postprocessing effects that will be used for your render.
function Effects() {
// A switch that turns effects on and off.
const [hasEffects, setHasEffects] = useState(true)
// A callback destructuring for the onChange parameter.
// `factor` is the current quality scale between 0 and 1.
usePerformanceMonitor({ onChange: ({ factor }) => {
// If effects are currently enabled and
// the factor is higher than average...
if (hasEffects && factor > 0.5) {
// ...decrease quality.
effect.qualityScale = round(0.5 + 0.5 * factor, 1)
}
// Handle other conditions
// when PerformanceMonitor says
// to decline or incline
}})
return (
{ /** Your effects */ }
)
}
function App() {
// Starting out with the highest resolution,
// reduce the resolution if the framerate is too low.
const [dpr, setDpr] = useState(2)
return (
)
}
```
## See it live
[Check out the Next.js conference registration page](https://nextjs.org/conf/oct22/registration) for the full experience—and don’t forget to claim your free ticket while you’re there. Can you collect all three tickets by playing the games?
---
¹ *We'd like to give a thanks to outside contributors to our mood board, including artists like Davo Galavotti.*
---
**More posts:** [View all blog posts](https://vercel.com/blog/sitemap.md) | [Changelog](https://vercel.com/changelog/sitemap.md)