Tool Calling to Connect to External Data Sources
Your chatbot has personality (system prompts) and a beautiful UI (Elements), but it lacks real-time knowledge. It doesn't know today's weather, can't check prices, or access current data.
Tools let your AI call functions to fetch data, perform calculations, or interact with external APIs. They bridge the gap between the AI's static knowledge and the dynamic real world.
We'll add tool calling to our Elements-powered chat interface. Building on the basic chatbot and system prompts lessons, we'll extend our chat with real-world data access. The professional UI will make tool invocations visible and interactive!
The Problem: LLM Limitations
Base LLMs operate within constraints:
- Knowledge Cutoff: Lack real-time info (weather, news, stock prices). LLMs are training on a static dataset, so typically only have data earlier than their knowledge cutoff date.
- Inability to Act: Cannot directly interact with external systems (APIs, databases). LLMs produce text. They don't have capabilities beyond that.
Asking "What's the weather in San Francisco?" fails because the model lacks live data access. The model has no idea what the current weather is in San Francisco. AI is amazing, but the model is always a snapshot of the past.
Thankfully this problem can be solved with "tool calling" which gives your model the ability to run code based on your conversation context. The results of these function calls can then be fed back into your prompt context to generate a final response.
Calling Tools with the AI SDK (Function Calling)
Tools allow the model to access functions based on conversation context. They are like a hotline the LLM can pick up, call a pre-defined function, and pop the results back inline.
Here's the Flow:
- User Query: Asks a question requiring external data/action.
- Model Identifies Need: Matches query to tool
description. - Model Generates Tool Call: Outputs structured request to call specific tool with inferred parameters.
- SDK Executes Tool: API route receives call, SDK invokes
executefunction. - Result Returned:
executefunction runs (e.g., calls weather API), returns data. - Model Generates Response: Tool result is automatically fed back to model for final text response.
If you've used a coding environment like Cursor, you've seen this flow in action. That's how Cursor and similar tools interact with your codebase.
Remember that tools grant LLMs access to real-time data and action capabilities, dramatically expanding chatbot usefulness.
To see this in action you'll build a tool to check the weather.
Step 1: Define getWeather Tool
Create a new file app/api/chat/tools.ts to define our weather tool.
Tool endpoints in this lesson live under /app/api/chat because we need a
reusable HTTP surface that the useChat hook (and anything else) can fetch.
The AI SDK defaults to that Route Handler path, so keep it in place for chat
flows even if you reuse the same mutation logic elsewhere. When your UI is the
only caller and the mutation is form-driven, Server Actions keep things
ergonomic (secure secrets, automatic revalidation, no endpoint). If other
clients (mobile apps, webhooks, cron jobs) hit the same logic, move it into a
Route Handler or share a module between both surfaces.
The Next.js docs on Updating Data,
Route Handlers,
and the Backend-for-Frontend guide
lay out the trade-offs, and the AI SDK Next.js quickstart
documents the default /app/api/chat contract.
- Start with the basic structure:
import { tool } from 'ai';
import { z } from 'zod';

export const getWeather = tool({
  // TODO: Add a clear description for the AI to understand when to use this tool
  description: '',

  // TODO: Define the input schema using Zod
  // The tool needs a 'city' parameter (string)
  inputSchema: z.object({
    // Add schema here
  }),

  // TODO: Implement the execute function
  // This function runs when the AI calls the tool
  execute: async ({ city }) => {
    // Implementation goes here
  },
});- Add the description to help the AI understand when to use this tool:
export const getWeather = tool({
  description: `Get the current weather conditions and temperature for a specific city.`,

  // Still TODO: inputSchema and execute
});
The description is what the AI reads to decide if this tool matches the user's request.
The description field is crucial - it's how the AI understands when to use your tool. Be specific and clear:
- ✅ Good: "Get current weather for a specific city. Use when users ask about weather, temperature, or conditions."
- ❌ Bad: "Weather tool"
The AI uses semantic matching between the user's query and your description to decide which tool to call.
- Define the input schema - what parameters the tool needs:
export const getWeather = tool({
  description: `Get the current weather conditions and temperature for a specific city.`,

  inputSchema: z.object({
    city: z.string().describe('The city name for weather lookup'),
  }),

  // Still TODO: execute function
});
The AI will extract the city name from the user's message and pass it to your tool.
Unsure about what parameters your tool should accept or how to structure them? Try this:
<context>
I'm building a tool for my Vercel AI SDK chatbot using the `tool()` helper with Zod schemas.
My tool will: [describe what your tool does]
Target use cases: [describe when users would invoke this tool]
</context>

<tool-purpose>
Tool name: getWeather
Purpose: Fetch current weather conditions and temperature for a specified location
External API: Open-Meteo weather API (free, no key needed)
</tool-purpose>

<current-schema-draft>
inputSchema: z.object({
  city: z.string().describe('The city name for weather lookup'),
})
</current-schema-draft>

<questions>
1. **Parameter granularity:** Should I just accept "city" or also "country" to handle ambiguous city names (e.g., Paris, France vs Paris, Texas)?

2. **Optional parameters:** Should I add optional fields like:
   - `units` (celsius/fahrenheit)?
   - `includeHourly` (boolean for detailed forecast)?
   Or keep it simple with just required fields?

3. **Validation:** Should I use `.refine()` to validate city names, or trust the AI to extract valid inputs?

4. **Description quality:** My current description is "The city name for weather lookup" - is this specific enough for the AI to:
   - Extract the right parameter from conversational queries?
   - Handle variations like "What's it like in SF?" → city: "San Francisco"?

5. **Edge cases:** How should my schema handle:
   - Misspelled city names?
   - Cities with special characters (São Paulo)?
   - Coordinates instead of city names (some users might provide lat/lon)?
</questions>

<example-user-queries>
- "What's the weather in San Francisco?"
- "Is it raining in NYC?"
- "Tell me about the temperature in Tokyo today"
- "Weather forecast for London, UK"

Should my schema handle all of these, or should I keep it simple and rely on the AI to normalize inputs?

Recommend a schema design with rationale for each decision (parameter choices, validation, edge case handling).
</example-user-queries>
This will help you design robust, flexible tool schemas that handle real-world usage patterns!
- Implement the execute function with a simple weather API:
export const getWeather = tool({
  description: `Get the current weather conditions and temperature for a specific city.`,

  inputSchema: z.object({
    city: z.string().describe('The city name for weather lookup'),
  }),

  execute: async ({ city }) => {
    // For demo: use a simple city-to-coordinates mapping
    // In production, you'd use a geocoding API
    const cityCoordinates: Record<string, { lat: number; lon: number }> = {
      'san francisco': { lat: 37.7749, lon: -122.4194 },
      'new york': { lat: 40.7128, lon: -74.006 },
      london: { lat: 51.5074, lon: -0.1278 },
      tokyo: { lat: 35.6762, lon: 139.6503 },
      paris: { lat: 48.8566, lon: 2.3522 },
    };

    const coords = cityCoordinates[city.toLowerCase()] ||
                   cityCoordinates['new york']; // Default fallback

    // Call the free Open-Meteo weather API (no key needed!)
    const response = await fetch(
      `https://api.open-meteo.com/v1/forecast?` +
      `latitude=${coords.lat}&longitude=${coords.lon}&` +
      `current=temperature_2m,weathercode&timezone=auto`
    );

    const weatherData = await response.json();

    return {
      city,
      temperature: weatherData.current.temperature_2m,
      weatherCode: weatherData.current.weathercode,
    };
  },
});You built a complete tool in 4 progressive steps:
- Description: Tells the AI when to use this tool
- Input Schema: Defines what parameters the AI should extract
- Execute Function: The actual code that runs when called
- Return Value: Structured data the AI can use in its response
The Open-Meteo API is free and requires no API key - perfect for demos!
Step 2: Connect the Tool to Your API Route
Now update your API route to use this tool. Modify app/api/chat/route.ts:
import {
	streamText,
	convertToModelMessages,
	createUIMessageStreamResponse,
	toUIMessageStream,
} from "ai";
import { getWeather } from "./tools";

export const maxDuration = 30;

export async function POST(req: Request) {
	try {
		const { messages } = await req.json();

		const result = streamText({
			model: "openai/gpt-5-mini", // Fast model handles tool calling efficiently for real-time interactions
			instructions: "You are a helpful assistant.",
			messages: await convertToModelMessages(messages),
			tools: { getWeather },
		});

		return createUIMessageStreamResponse({
			stream: toUIMessageStream({ stream: result.stream }),
		});
	} catch (error) {
		console.error("Chat API error:", error);

		return new Response(
			JSON.stringify({
				error: "Failed to process chat request",
				details: error instanceof Error ? error.message : "Unknown error",
			}),
			{
				status: 500,
				headers: { "Content-Type": "application/json" },
			},
		);
	}
}
Key changes:
- Import the
getWeathertool from./tools - Add
tools: { getWeather }to register it with the AI
Your chatbot now has access to the weather tool! Try asking "What's the weather in Tokyo?" - but you'll notice the response shows raw JSON data. Let's fix that next.
Step 3: Handle Tool Calls in the UI
With tools enabled, messages now have different parts - some are text, some are tool calls. We need to handle both types.
First, update your message rendering to check the part type. Remember our current code just shows text? Let's evolve it:
// Current code - only handles text:
{message.role === "assistant" ? (
  <Response>
    {message.parts
      ?.filter((part) => part.type === "text")
      .map((part) => part.text)
      .join("")}
  </Response>
) : (
  // user messages...
)}
Now let's handle both text AND tool calls. We'll use a switch statement to handle different part types:
// Updated code - handles multiple part types:
{message.role === "assistant" ? (
  message.parts?.map((part, i) => {
    switch (part.type) {
      case "text":
        return (
          <Response key={`${message.id}-${i}`}>
            {part.text}
          </Response>
        );
      case "tool-getWeather":  // Tool parts are named "tool-TOOLNAME"
        // For now, show raw JSON to see what we're working with
        return (
          <div key={`${message.id}-${i}`} className="text-xs font-mono p-2 bg-gray-100 rounded">
            Weather Tool Called:
            <pre>Input: {JSON.stringify(part.input, null, 2)}</pre>
            <pre>Output: {JSON.stringify(part.output, null, 2)}</pre>
          </div>
        );
      default:
        return null;
    }
  })
) : (
  // user messages stay the same...
)}
Test it now: Ask "What's the weather in San Francisco?" and you'll see:
- Your message appears
- Raw tool call data showing the city parameter
- The temperature and weather data returned
- The AI's final response using that data
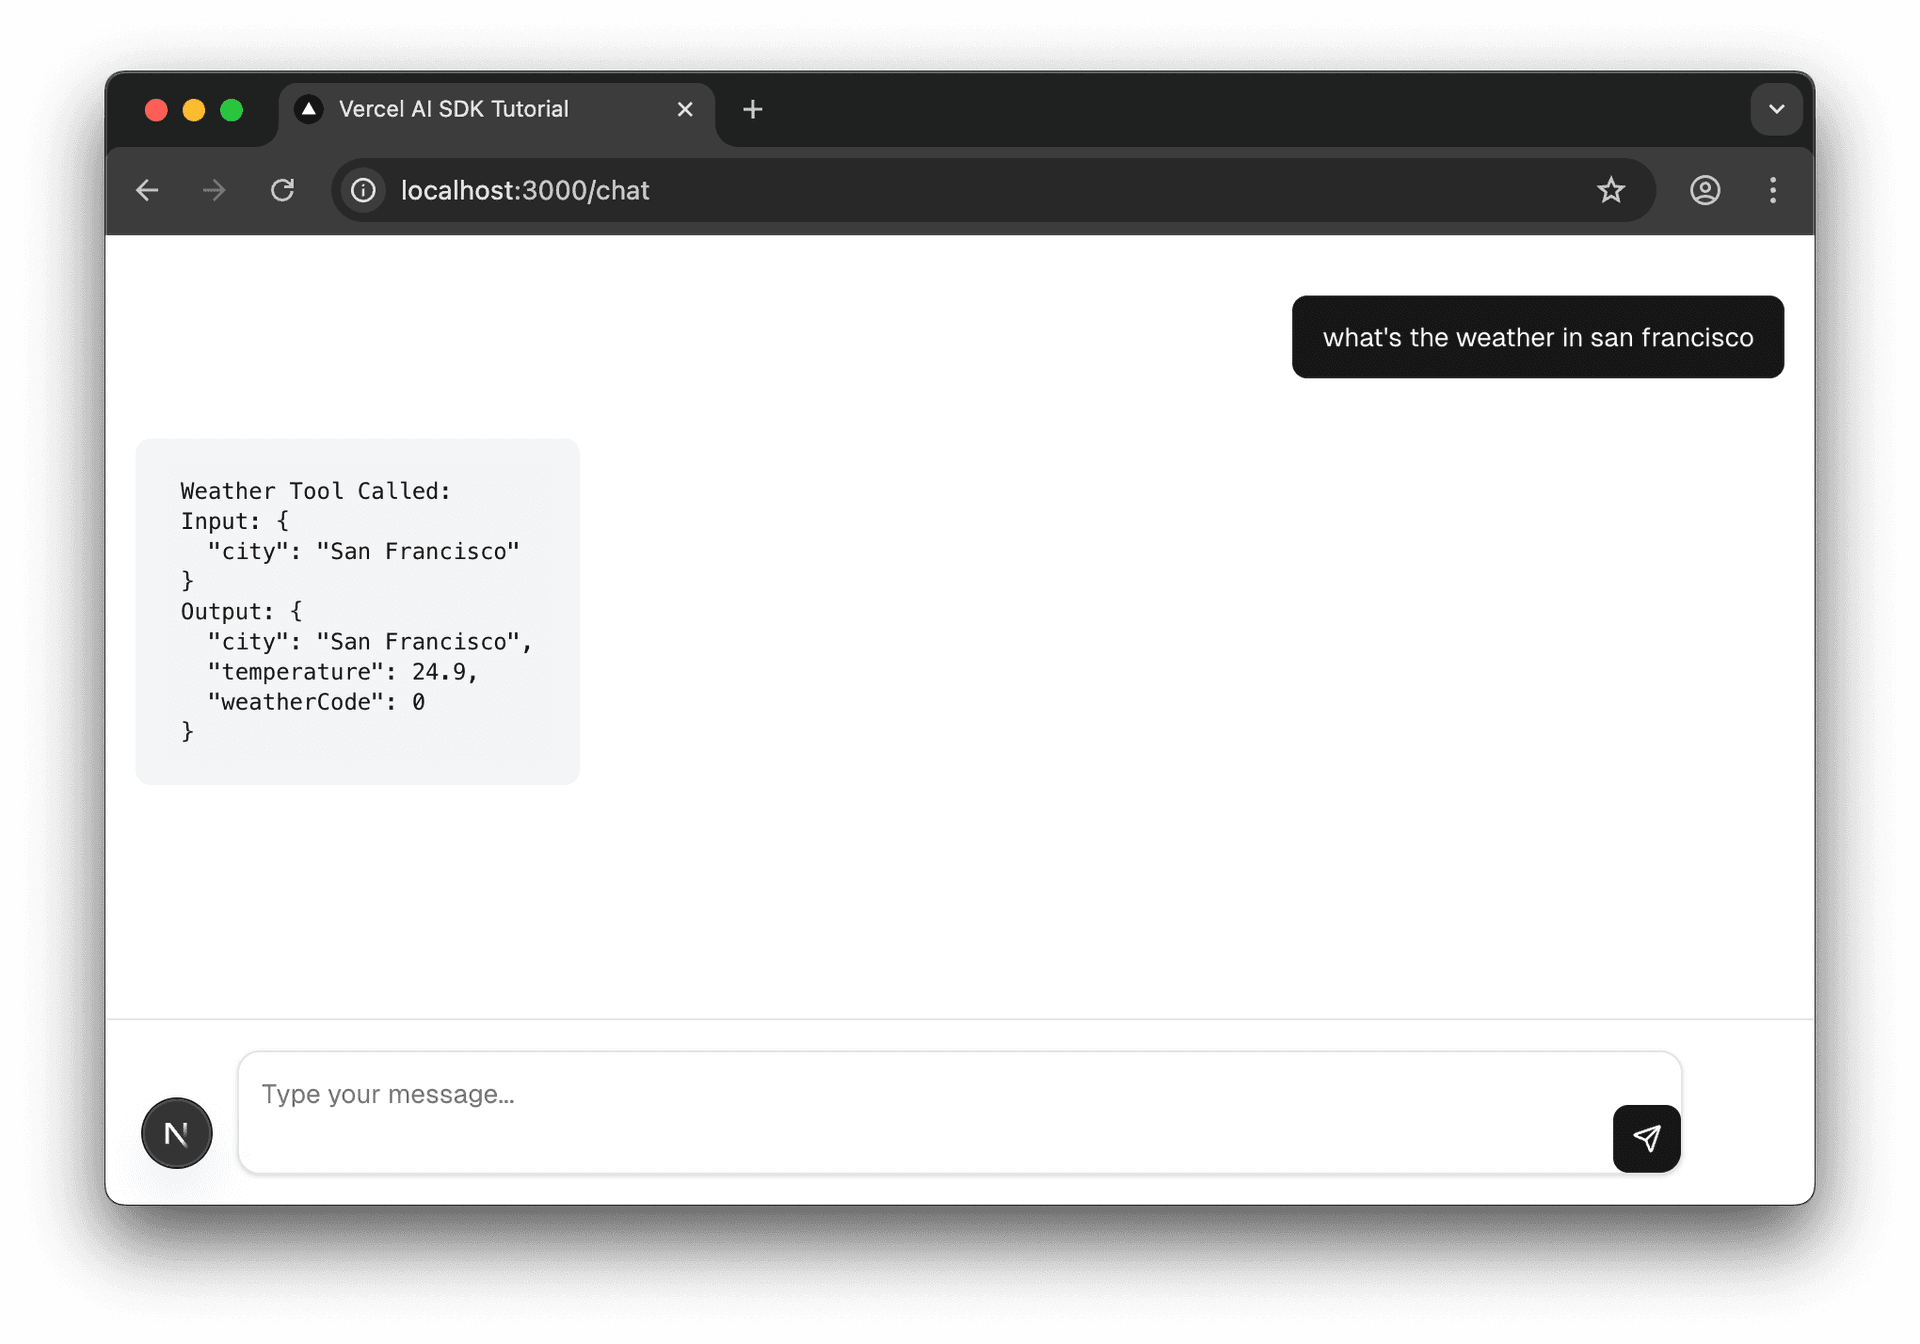
This raw view helps you understand the tool calling flow!
Step 4: Make It Beautiful with Elements
Now that you understand the raw data, let's replace that JSON dump with beautiful Elements components. First, add the Tool imports to your existing imports:
import { Response } from "@/components/ai-elements/response";
import {
  Tool,
  ToolContent,
  ToolHeader,
  ToolInput,
  ToolOutput,
} from "@/components/ai-elements/tool";
import {
  PromptInput,
Then replace your raw JSON display with the Elements components:
switch (part.type) {
  case "text":
    return (
      <Response key={`${message.id}-${i}`}>
        {part.text}
      </Response>
    );
  case "tool-getWeather":
    // Replace the raw JSON with Elements components
    return (
      <Tool key={part.toolCallId || `${message.id}-${i}`}>
        <ToolHeader type={part.type} state={part.state} />
        <ToolContent>
          <ToolInput input={part.input} />
          <ToolOutput
            output={JSON.stringify(part.output, null, 2)}
            errorText={part.errorText}
          />
        </ToolContent>
      </Tool>
    );
  default:
    return null;
}
Test it: Ask "What's the weather in San Francisco?" again. Now instead of raw JSON, you'll see:
- A beautiful tool card with the tool name and status
- Formatted input parameters showing the city
- Nicely displayed output data with temperature and humidity

The Elements components automatically handle loading states, errors, and formatting - much better than raw JSON!
Step 5: Test the Complete Implementation
Start your dev server:
pnpm devNavigate to http://localhost:3000/chat and ask: "What's the weather in San Francisco?"
You should now see:
- Your message - "What's the weather in San Francisco?"
- Tool execution card - Shows the weather API call with input city and output data
Notice you only see the tool output - no AI explanation of the weather data. By default, the AI stops after executing a tool and returns the raw results.
To get the AI to provide a natural language response that synthesizes the tool data (like "The weather in San Francisco is 19°C and cloudy"), you need to enable multi-step conversations. We'll cover this in the next lesson!
Key Takeaways
You've given your chatbot superpowers with tool calling:
- Tools extend AI capabilities - Access real-time data, perform calculations, call APIs
- The
toolhelper defines what tools can do with description, parameters, and execute - Tool registration via
toolsproperty - Makes tools available to the model - Elements UI displays everything beautifully - Professional presentation of both text and tool activity
Further Reading (Optional)
Strengthen your tool-calling implementation with these security-focused resources:
- LLM Function Calling Security (OpenAI Docs)
Official guidance on hardening function calls (parameter validation, auth, rate limits). - OWASP Top 10 for LLM Applications
Community-maintained list of the most critical security risks when deploying LLMs. - Prompt Injection Payloads Encyclopedia (PIPE)
A living catalogue of real-world prompt-injection vectors to test against. - NVIDIA NeMo Guardrails Security Guidelines
Practical design principles for safely granting LLMs access to external tools/APIs. - Function Calling Using LLMs — Martin Fowler
Architectural walkthrough of building a secure, extensible tool-calling agent. - Step-by-Step Guide to Securing LLM Applications (Protect AI)
Lifecycle-based checklist covering training, deployment and runtime hardening.
Up Next: Multi-Step Conversations & Generative UI
Your model can now call a single tool and provide responses. But what if you need multiple tools in one conversation? Or want to display rich UI components instead of just text?
The next lesson explores Multi-Step Conversations where the AI can chain multiple tool calls together, and Generative UI to render beautiful interactive components directly in the chat.
Was this helpful?